使用 Plop 生成模板
由于本博客文章的特殊编写模式,会有两段类似结构,仅作用不同,每次都要写两遍,使用 plop 提前设置好格式,在命令行仅需补充字段即可。
起因
本博客采用 markdown 为主要编写格式,想要打包后生成的html文件,能够有单独的 title 、description 和 keywords,需要在 markdown 文件头部添加一段 特殊代码,如下:
---
title: 使用 plop 生成模板
meta:
  - name: description
    content: 使用 plop,通过命令行,快速生成博客模版,减少本博客因为特殊性,导致的重复代码。
  - name: keywords
    content: Plop, Generator, Template
---但是在逻辑中,想要在列表页中,展示出文章的 title 、description、 keywords 和 date 等,则需要在 markdown 文件头部添加一段路由信息,如下:
<route lang="yaml">
meta:
  title: 使用 plop 生成模板
  desc: 使用 plop,通过命令行,快速生成博客模版,减少本博客因为特殊性,导致的重复代码。
  keywords: [Plop,Generator,Template]
  date: 2023-06-30 21:30:59
</route>这两段代码,仅仅是作用不同,但是结构相同,每次都要写两遍,所以想要通过plop,通过命令行,快速生成博客模版,减少本博客因为特殊性,导致的重复代码。
什么是 Plop
简单来说Plop就是是一个小型的、零依赖的、可编程的代码生成器,可以通过命令行,快速生成代码,减少重复代码。详情介绍可以参考What is Plop?。
安装 Plop
pnpm add plop -D创建 Plop 目录与 npm script
目录结构
以本博客为例,在项目根创建如下目录结构:
├── plop
│   ├── blog
│   │   └── index.md.hbs
│   └── config.js
其中 config.js 是 plop 的配置文件,blog 目录下 index.md.hbs 是模版文件,.hbs 是handlebars的后缀,handlebars是一个简单的模版语言,可以通过{{}}来插入变量,{{#if}}来判断条件,{{#each}}来遍历数组等,具体语法可以参考 handlebars.js。
npm script
在package.json中的scripts添加如下命令:
{
  "scripts": {
    "create:blog": "plop --plopfile ./plop/config.js"
  }
}
配置 Plop config 文件
在plop/config.js中,添加如下代码:
import { exec } from 'node:child_process'
export default function (
/** @type {import('plop').NodePlopAPI} */
plop,
) {
const today = '2023-06-30'
plop.setHelper('date', () => {
return '2023-06-30 21:30:59'
})
// 自定义打开文件action
plop.setActionType('openFile', (answers, config) => {
exec(`code ${config.path.replace('fileName', answers.fileName)}`)
})
// 创建博客模版命令
plop.setGenerator('blog', {
description: '创建一个blog:',
prompts: [
{
type: 'input',
name: 'fileName',
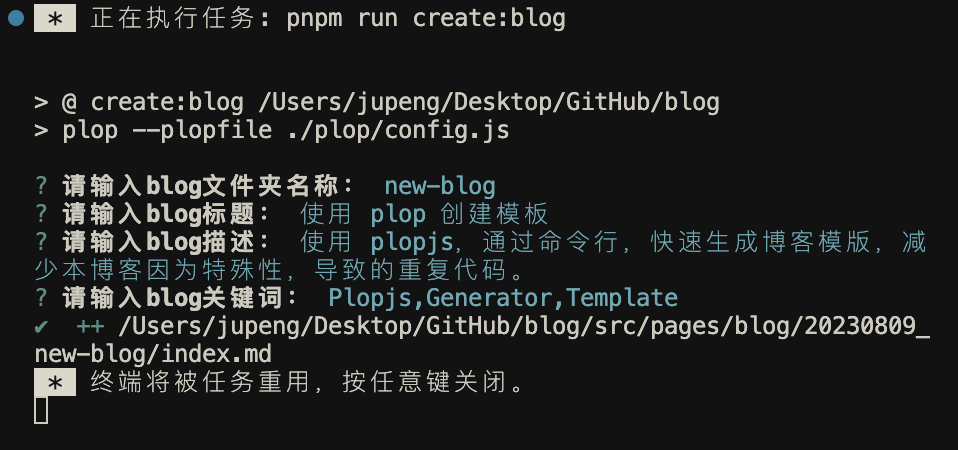
message: '请输入blog文件夹名称:',
},
{
type: 'input',
name: 'title',
message: '请输入blog标题:',
},
{
type: 'input',
name: 'desc',
message: '请输入blog描述:',
},
{
type: 'input',
name: 'keywords',
message: '请输入blog关键词:',
},
],
actions: [
{
type: 'add',
path: `../src/pages/blog/${today}_{{fileName}}/index.md`,
templateFile: './blog/index.md.hbs',
data: {
title: '{{title}}',
desc: '{{desc}}',
keywords: '{{keywords}}',
},
},
{
type: 'openFile',
path: `./src/pages/blog/${today}_fileName/index.md`,
}
],
})
}setHelper
setHelper用来注册一个handlebars的 helper,可以在模版中使用,你也可以进行传参数,进行动态的渲染:
plop.setHelper('upperCase', txt => txt.toUpperCase())更多请查看:setHelper。
setGenerator
setGenerator 方法用于定义生成器(generator)。生成器是 Plop 框架的核心概念之一,它允许您创建可重复使用的代码生成模板。下面是 setGenerator 方法的详细说明:
plop.setGenerator(name, config)name:生成器名称,用于标识生成器。在运行 Plop 时,您将使用这个名称来选择特定的生成器。config:生成器的配置对象,包含以下属性:description:生成器的描述,可以提供一些关于生成器目的的信息。prompts:用户提示的数组,每个提示定义了一个用户输入的信息。提示可以包括以下属性:type:提示类型,可以是 ‘input’、‘confirm’、‘list’ 等,取决于需要的用户输入类型。name:提示名称,用于在模板中引用用户输入的值。message:提示用户的消息,说明用户应该提供什么样的信息。
actions:生成器运行时要执行操作任务数组。每个操作可以包括以下属性:type:操作类型,可以是 ‘add’、‘modify’、‘append’ 等,取决于对生成文件进行的操作。path:生成文件的路径,可以是相对路径或绝对路径。templateFile:模板文件的路径,用于根据用户输入和模板生成最终的文件内容。
更多请查看:setgenerator
setActionType
setActionType 方法允许您创建自己的 Action,这些操作可以在plopFiles中使用。这些基本上是高度可重用的自定义操作函数:
import { exec } from 'node:child_process'

// 自定义打开文件action
plop.setActionType('openFile', (answers, config, plop) => {
  exec(`code ${config.path.replace('fileName', answers.fileName)}`)
})例如在上面的代码中,我们注册了一个openFile的操作类型,目的是能够打开创建的文件,通过VSCode自带的code命令,打开文件。
setActionType 方法的详细说明:
plop.setActionType(name, handler)name:操作类型名称,用于标识操作类型。handler:操作类型的处理函数,用于执行操作。处理函数接收三个参数:answers:用户输入的答案对象,包含用户输入的所有信息。config:操作配置对象,包含操作的所有配置信息。plop:Plop 实例,可以用于访问 Plop 的其他方法。
更多请查看:setactiontype
在上面的代码中,我们注册了一个openFile的操作类型,目的是能够打开创建的文件。
配置模版文件
在plop/blog/index.md.hbs中,添加如下代码:
---
title: {{ title}}
meta:
  - name: description
    content: {{ desc }}
  - name: keywords
    content: {{ keywords }}
---

<route lang="yaml">
meta:
  title: {{ title}}
  desc: {{ desc}}
  keywords: [{{ keywords }}]
  date: {{ date }}
</route>

# {{ title}}
{{ desc }}可以看到,我们在模版中使用了handlebars的语法,{{ title}}、{{ desc }}、{{ keywords }}都是通过用户输入的值来进行渲染的,date 是通过setHelper注册的 helper 方法来进行渲染的。
本次 setHelper注册的 helper 方法 未使用到参数,若需要传递参数,可以这样写:
plop.setHelper('fn', (text) => {
  return text.toUpperCase()
})
然后在模版中使用:
{{ fn 'hello world' }}生成的结果为:
HELLO WORLD运行 Plop 命令
完整 Plop 文档查阅
官方文档:plopjs